Showing posts with label Pioneer Woman. Show all posts
Thursday, June 5, 2014
Pioneer Woman's Pancetta Pasta with Leeks
The first time I ever cooked with leeks was using another Pioneer Woman recipe and the first time I used them, I used them completely wrong. Now that I know how to use them I love them so when I saw another one of PW's recipes with leeks I was sold.
What you need:
12 oz. bow tie pasta
3 oz. chopped Pancetta (or thinly sliced bacon)
3 whole leeks, thinly sliced
1 Tablespoon butter
1/2 cup Dry White Wine
1/2 cup Heavy Whipping Cream
Shaved Parmesan cheese
Salt and Pepper to taste
Steps:
Cook pasta and set aside (reserve 1/2 cup pasta water in case needed later)
Saute the chopped pancetta until it starts to brown then add the sliced leeks and butter and cook for 8 minutes
After pancetta and leeks have cooked for 8-10 minutes add the white wine and cook 1-2 minutes
Reduce heat to low then add in the heavy whipping cream
Stir in salt and pepper and parmesan
Toss these ingredients in with the cooked pasta adding a little pasta water if needed
Top with Parmesan and eat warm! Yum!
Original recipe found here!
Friday, May 30, 2014
Raspberry Crisp (The perfect dessert)
What you need for the berry mixture:
2 1/2 cups fresh raspberries
1 Tablespoon Cornstarch
2/3 cup sugar
1 tsp. Vanilla extract
What you need for the topping:
1 cup flour
1/4 cup sugar
1/4 cup brown sugar
1/3 cup oats
1/4 cup chopped Pecans
Dash of Salt
3/4 sticks butter cut into small pieces
Vanilla ice cream
Steps:
Start by preheating the oven to 350 degrees
Make berry mixture by combining rinsed raspberries, corn starch, 2/3 cups sugar and vanilla in a medium sized bowl. Stir and set aside.
In another bowl combine flour, 1/4 cup sugar, brown sugar, oats, pecans, salt and butter pieces, which will be used for the top of the crisp. Use a pastry cutter to mix ingredients until it is crumbly.
Add the berry mixture to a small pie pan. Sprinkle the crisp topping all over the top until covered evenly.
Bake 25-30 minutes until topping is golden brown. Let dish sit for 10 minutes to cool before serving. Serve warm with vanilla ice cream. Mmmmm.
For the original recipe, click here!
Wednesday, November 27, 2013
Meeting Ree Drummond aka Pioneer Woman!
If any of you have read my blog for any length of time you know I am pretty much obsessed with Pioneer Woman. I got giddy when I found out she was going to be in Cincinnati again. And this past Monday I got to meet her for the second time. I mean look at us...we are basically BFF. I told her I had a tab on my blog dedicated to her recipes and since I was in the first flight of people to meet her I felt like I got some quality time to chat with her. She is so sweet and down to earth.
If you are looking for a great Christmas gift for a friend, your Mom, Aunt, Grandma...this is it. Ree's holiday cookbook is amazing and I highly recommend it. I can't wait to start cooking out of this cookbook!
I also got to hang out with Sarah and finally meet Bethany! |
PW, my dear friend Alison and I. |
Ree and her adorable daughters! |
I now have all 3 of her cookbooks signed! |
Tuesday, October 22, 2013
A PW Recipe Revisited (Potatoes+Pizza)
If you don't already know, my husband has Ree Drummond to thank for my love of cooking. When we first got married I did not think I would ever truly love cooking, but then one fateful day I ran across the Pioneer Woman and her amazing blog. My life was forever changed.
So the other day I pulled out a Pioneer Woman recipe that I made around this time a few years ago. I remember absolutely loving her Potato Leek Pizza so I decided to make it again. I loved it so much I had even dedicated a post on how to make it here. Well looking back, I realized that the first time I made it, I used the WRONG part of the leek in the recipe. Oops. You'd think that me using the wrong part of vegetable might affect the taste, but it was still freaking good and I didn't know any better. This time around I used the base of the leek and it was so much better!
My cooking really has come a long way. Sorry to any of you who followed my directions on that post and used the top of the leek. Who knew? (Obviously I didn't) Haha. Here is how the pizza is supposed to be constructed...
Potato Leek Pizza Recipe Revisited
Here is what you will need:
-Pizza dough
-5 small red or Yukon potatoes
-4 oz. Goat Cheese
-6 slices of thick Bacon cut into 1 inch pieces
-1 pound Mozzerella Cheese
-3 Leeks (using only the base, not the top leafy part)
-Extra Virgin Olive Oil
-Ground Pepper/Salt
Lay out your pizza dough and preheat the oven according to the dough you choose and lightly coat dough with olive oil
Place bacon in skillet over medium heat. Fry until cooked, but not crisp then remove from pan
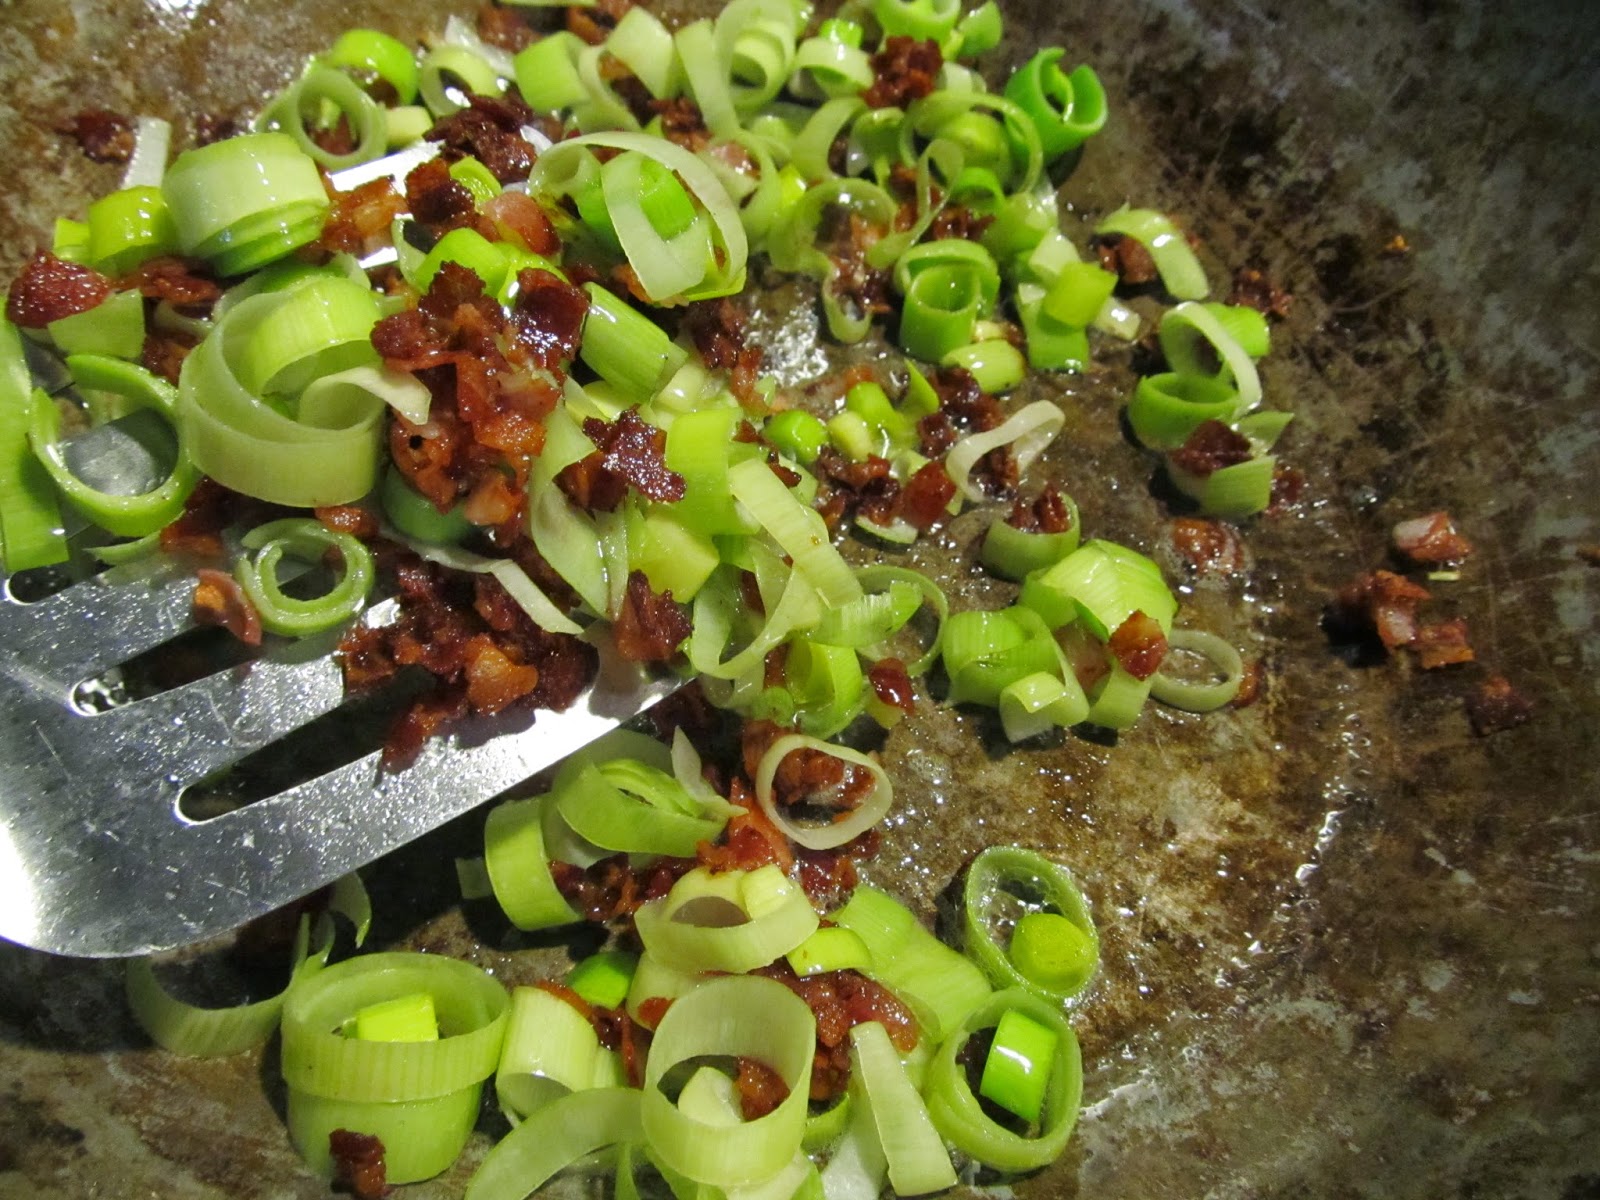
Use the same skillet after draining grease to saute the leeks (set bacon and leeks aside.) This is the part I totally butchered last time so make sure you use the base of the leek, it should resemble the texture of an onion and should actually saute unlike the top leafy part.
Thinly slice potatoes and layer around pizza in a single layer
Sprinkle potatoes lightly with salt then layer mozzarella on top of the potatoes
Place leeks on top of cheese then add bacon
Add crumbled goat cheese and ground pepper
Tuesday, September 24, 2013
PW APPLE DUMPLINGS {with a secret ingredient}
Fall baking is just fantastic. I absolutely adore any and every fall flavor including apple. When deciding on a fall recipe to try out this past weekend, I quickly turned to Pioneer Woman expecting to spend at least 2 hours baking in the kitchen. To my surprise I found the easiest and least time consuming PW recipe of all time: Apple Dumplings. Not only are these little treats easy, but they are divine and you just won't believe what the secret ingredient is.
See if you can spot which ingredient doesn't belong in this picture...
Yes, why that is Mountain Dew in the picture...it is not a mistake. It is actually the secret ingredient to an amazing apple dumpling! Sounds crazy, I thought so too, but I trust PW with food so I just followed her directions and was not disappointed. Here's what else you will need...
Cast of Characters:
2 Granny Smith Apple (peeled and sliced into 8 wedges/apple)
2 8 oz. cans crescent rolls
2 sticks butter
1 1/2 cups sugar
1 teaspoon vanilla
1 can (12 oz.) Mountain Dew
Ground Cinnamon
Steps:
1. Preheat oven to 350
2. Peel apples and chop into 16 wedges
3. Add one apple wedge to each crescent roll and wrap up
4. Butter a 9x13 dish and set each crescent roll face down in dish
5. Melt butter in medium sauce pan then add sugar and vanilla and
stir for a few minutes. The sugar does not need to fully dissolve in the
butter. Grainy is good.
6. Pour butter mixture evenly over the apple filled crescent rolls
7. Now here's the scary awesome part...pour the 12 oz. can evenly over top of the whole mixture
8. Sprinkle with Ground Cinnamon
9. Stick in the oven and bake for 40 minutes. It will start to smell amazing so try to resist taking it out early!
10. Let it cool and eat with vanilla ice cream!!!
These Apple Dumplings are the best I've ever had. I mean whatever the Mountain Dew does to the crescent roll is seriously delicious. You have to let me know if you try these. Hot or cold they are yummy. I promise I am NOT crazy!
Original recipe found here!
Saturday, October 6, 2012
Applefest and an apple recipe!
One of my favorite fall festivals here in Cincinnati is the AppleFest in Lebanon. Lebanon is an adorable little town full of antique stores and one of my favorite ice cream parlors. This ice cream parlor was actually where they filmed a scene from Milk Money (does anyone remember that movie???).
AppleFest is full of apple treats from local orchards as well as craft booths. My favorite apple treat has to be an apple fritter. They are to.die.for.
So as I was chowing down on an apple fritter I was wondering how these delicious treats were made. I googled it and my favorite person pops up as having a recipe for Apple fritters. I will be trying these and thought you might want to too. Here's the link for Pioneer Woman's Apple Fritters!
Thursday, September 6, 2012
Hurry...go get some peaches!
I hope you never get sick of me talking about Pioneer Woman...because I end up cooking at least one of her meals per week and they are always amazing so I always share them. For a Labor day cookout I decided to try out her Peach Crisp with some huge peaches I had bought at a local fresh market near my house. I'm so glad I made this while peaches were still in season because it is sinfully delicious and not very difficult to make. What makes this recipe especially delicious is the maple cream sauce. Oh my goodness is it good!
What you will need:
5 to 6 whole peaches (peeled and sliced)
1 cup flour
1/2 cup sugar
1/2 cup brown sugar (packed)
1/2 tsp. Cinammon
1/2 tsp. Ground Nutmeg
1/4 tsp. salt
1 stick butter
1/2 Lemon
7 Tbsp. of Maple syrup (divided between sauce and the crisp)
1 and 1/2 cups Whipping cream
3 Tbsp. Light Corn Syrup
All it takes is a little stirring...
And then some measuring and mixing...
Some cutting and zesting...
A little baking and of course some eating...I ate mine before I could snap a picture.
It's that good.
For the full PW version recipe click here!
Monday, August 27, 2012
A corn husking tip that will change your life
For a cookout this past weekend I decided to make Pioneer Woman's Grilled Corn Guacamole. While I was making it I learned a life changing tip...and it has to do with corn. If you've ever husked corn you know how annoying those little strings are right? Well I found a way to never have to peel another corn string away.ever. Are you intrigued?
So here's how it's done. Take the corn and leave it in the husk, toss it in the microwave for 4 minutes. Use an oven mitt to take the corn out of the microwave and put the corn on a chopping board. Cut off the husk. Make sure to cut enough of the husk away or it just won't work. Use the hairs at the other end and shake. The corn should slide right out string free! I did it and it worked. Then I did it again, and then again one more time to show my husband. Am I easily amused or is this really a cool trick?
If you can do this in the microwave I see no reason why this can't also be done on the grill...just leave the corn in the husk, throw on the grill, cut the husk and shake. Simple as that.
Oh and the dip...it turned out freaking amazing, but what Pioneer Woman recipe doesn't? I have yet to find one and I have now cooked over 30 of her recipes, yep I counted.
Click here for the recipe!
Thursday, July 26, 2012
Knock You Naked Brownies
You are in for a treat today...literally. For the Bachelorette finale on Sunday I wanted to make something yummy to take to my friend Andrea's house and I found the perfect thing! Knock you naked brownies from who else...Pioneer Woman. I've been told I should get a commission for how many times I mention her on this here blog.
1. Assemble your ingredients:
-1 box (18.5 oz) German Chocolate cake mix
-1 cup chopped pecans
-1/3 cup evaporated milk
-1/2 cup evaporated milk (additional)
- 1/2 cup (1 stick) melted butter
-60 caramels (go ahead and unwrap them before you start anything else!)
-1/3 cup semi-sweet chocolate chips
-1/4 cup powdered sugar (to sprinkle on top)
2. Making the brownie mixture
-In a large bowl add the cake mix, melted butter, chopped pecans and 1/3 cup evaporated milk. Stir together until mixed...mixture will be extremely thick!
3. Creating the bottom brownie layer
Divide the mixture in half and press that half down into an 8x8 or 9x9 well greased pan. (I also used flour to keep the brownies from sticking)
And my quote was inspired by all those comics floating around Pinterest. Enjoy!
4. Baking the bottom brownie layer
Bake at 350 for 8-10 minutes. While it's baking do step 5.
5. Melting the caramels
Boil water in a sauce pan and place your unwrapped caramels in a double boiler on top of the pan. Add 1/2 cup evaporated milk and stir.
6. The ooey gooey caramel layer
Once the caramels are melted and smooth pour the mixture on top of the bottom brownie layer.
7. More chocolate is never bad
Add 1/3 cup of chocolate chips to the caramel layer
8. Adding the top layer
This was the hardest part in my opinion...take the other half of your brownie mixture and form it into the shape of your brownie pan the best you can. Place on top of the caramel and put back in the oven at 350 for 20-25 minutes. When cooled add the powdered sugar!
9. Eat one now!
Another Pioneer Woman success and Jef won Emily's heart so we were happy girls. Cheers to that!
Wednesday, January 11, 2012
The Birthday boy...in a bowtie (G rated)
Today is my husband's birthday! Each year I spend with him I just feel more and more blessed and more and more in love with him. One thing I love about him is his adorable personality. Today he wore a bowtie to work and said "I'm wearing a bow tie because it's my birthday." I must say he looks pretty darn snazzy in a bow tie.
Drew has been in to meet my kiddos and they wanted to call him since it was his birthday. We left a message on his voice mail complete with Cha-cha-cha's in between each verse of Happy Birthday. How could that not make you smile? Drew requested meatloaf for his birthday dinner so I made Pioneer Woman's Meatloaf. It looked, smelled and most importantly tasted amazing. And this is from a girl who was never a huge fan of meatloaf ...until now. Anything that is wrapped in bacon can't be so bad right? Let me just tell you it is a must make recipe! You can find it here.
I am so thankful to have had another year to spend with my amazing husband. Happy Birthday hubby...I'm so happy to have you to wake up to every morning.
Saturday, October 15, 2011
PW Potato Leek Pizza
I'm still working my way through the Pioneer Woman cookbook and probably gaining pounds to show for it along the way.
The other night I tried her Potato Leek Pizza and oh my gaaaahsh it is amazing. I never would have put potatoes on my pizza, but I trust PW so I went for it and I'm not sorry.
Step 5: Place leeks on top of cheese then add bacon
The other night I tried her Potato Leek Pizza and oh my gaaaahsh it is amazing. I never would have put potatoes on my pizza, but I trust PW so I went for it and I'm not sorry.
Here is what you will need:
-Pizza dough
-5 small red or Yukon potatoes
-4 oz. Goat Cheese
-6 slices of thick Bacon cut into 1 inch pieces
-1 pound Mozzerella Cheese
-3 Leeks (yes these exist, I know that now)
-Extra Virgin Olive Oil
-Ground Pepper/Salt
Step 1: Lay out your pizza dough and preheat the oven according to the dough you choose and lightly coat dough with olive oil
Step 2: Place bacon in skillet over medium heat. Fry until cooked, but not crisp then remove from pan
Step 3: Use the same skillet after draining grease to saute the leeks (set bacon and leeks aside)
Step 4: Thinly slice potatoes and layer around pizza in a single layer
Step 4: Sprinkle potatoes lightly with salt then layer mozzarella slices on top of the potatoes
Excited for my pizza! |
Step 6: Add crumbled goat cheese and ground pepper
Step 7: Bake according to pizza instructions (at least 8-12 minutes)
Step 8: Enjoy!
Subscribe to:
Posts (Atom)